RabbitMQ 설치 테스트 해보기
우분투에서 설치 해본다.
설치해 본다.
ubuntu@ubuntu:~$ sudo apt install rabbitmq-server
Reading package lists... Done
Building dependency tree
Reading state information... Done
The following additional packages will be installed:
erlang-asn1 erlang-base erlang-crypto erlang-eldap erlang-ftp erlang-inets erlang-mnesia erlang-os-mon erlang-parsetools erlang-public-key erlang-runtime-tools erlang-snmp erlang-ssl erlang-syntax-tools erlang-tftp erlang-tools erlang-xmerl libsctp1
locales-all socat
Suggested packages:
erlang erlang-manpages erlang-doc lksctp-tools
The following NEW packages will be installed:
erlang-asn1 erlang-base erlang-crypto erlang-eldap erlang-ftp erlang-inets erlang-mnesia erlang-os-mon erlang-parsetools erlang-public-key erlang-runtime-tools erlang-snmp erlang-ssl erlang-syntax-tools erlang-tftp erlang-tools erlang-xmerl libsctp1
locales-all rabbitmq-server socat
0 upgraded, 21 newly installed, 0 to remove and 5 not upgraded.
Need to get 38.3 MB of archives.
After this operation, 277 MB of additional disk space will be used.
Do you want to continue? [Y/n] Y
GUI모드는 켜는 명령이라고 합니다.
ubuntu@ubuntu:~$ sudo rabbitmq-plugins enable rabbitmq_management
Enabling plugins on node rabbit@ubuntu:
rabbitmq_management
The following plugins have been configured:
rabbitmq_management
rabbitmq_management_agent
rabbitmq_web_dispatch
Applying plugin configuration to rabbit@ubuntu...
The following plugins have been enabled:
rabbitmq_management
rabbitmq_management_agent
rabbitmq_web_dispatch
started 3 plugins.
플러그인들이 켜져있는지 확인한다.
ubuntu@ubuntu:~$ sudo rabbitmq-plugins list
Listing plugins with pattern ".*" ...
Configured: E = explicitly enabled; e = implicitly enabled
| Status: * = running on rabbit@ubuntu
|/
[ ] rabbitmq_amqp1_0 3.8.2
[ ] rabbitmq_auth_backend_cache 3.8.2
[ ] rabbitmq_auth_backend_http 3.8.2
[ ] rabbitmq_auth_backend_ldap 3.8.2
[ ] rabbitmq_auth_backend_oauth2 3.8.2
[ ] rabbitmq_auth_mechanism_ssl 3.8.2
[ ] rabbitmq_consistent_hash_exchange 3.8.2
[ ] rabbitmq_event_exchange 3.8.2
[ ] rabbitmq_federation 3.8.2
[ ] rabbitmq_federation_management 3.8.2
[ ] rabbitmq_jms_topic_exchange 3.8.2
[E*] rabbitmq_management 3.8.2
[e*] rabbitmq_management_agent 3.8.2
[ ] rabbitmq_mqtt 3.8.2
[ ] rabbitmq_peer_discovery_aws 3.8.2
[ ] rabbitmq_peer_discovery_common 3.8.2
[ ] rabbitmq_peer_discovery_consul 3.8.2
[ ] rabbitmq_peer_discovery_etcd 3.8.2
[ ] rabbitmq_peer_discovery_k8s 3.8.2
[ ] rabbitmq_prometheus 3.8.2
[ ] rabbitmq_random_exchange 3.8.2
[ ] rabbitmq_recent_history_exchange 3.8.2
[ ] rabbitmq_sharding 3.8.2
[ ] rabbitmq_shovel 3.8.2
[ ] rabbitmq_shovel_management 3.8.2
[ ] rabbitmq_stomp 3.8.2
[ ] rabbitmq_top 3.8.2
[ ] rabbitmq_tracing 3.8.2
[ ] rabbitmq_trust_store 3.8.2
[e*] rabbitmq_web_dispatch 3.8.2
[ ] rabbitmq_web_mqtt 3.8.2
[ ] rabbitmq_web_mqtt_examples 3.8.2
[ ] rabbitmq_web_stomp 3.8.2
[ ] rabbitmq_web_stomp_examples 3.8.2
나중에 mqtt 쓸꺼니까 미리 mqtt를 켜준다.
ubuntu@ubuntu:~$ sudo rabbitmq-plugins enable rabbitmq_mqtt
Enabling plugins on node rabbit@ubuntu:
rabbitmq_mqtt
The following plugins have been configured:
rabbitmq_management
rabbitmq_management_agent
rabbitmq_mqtt
rabbitmq_web_dispatch
Applying plugin configuration to rabbit@ubuntu...
The following plugins have been enabled:
rabbitmq_mqtt
started 1 plugins.
ubuntu@ubuntu:~$ sudo rabbitmq-plugins list
Listing plugins with pattern ".*" ...
Configured: E = explicitly enabled; e = implicitly enabled
| Status: * = running on rabbit@ubuntu
|/
[ ] rabbitmq_amqp1_0 3.8.2
[ ] rabbitmq_auth_backend_cache 3.8.2
[ ] rabbitmq_auth_backend_http 3.8.2
[ ] rabbitmq_auth_backend_ldap 3.8.2
[ ] rabbitmq_auth_backend_oauth2 3.8.2
[ ] rabbitmq_auth_mechanism_ssl 3.8.2
[ ] rabbitmq_consistent_hash_exchange 3.8.2
[ ] rabbitmq_event_exchange 3.8.2
[ ] rabbitmq_federation 3.8.2
[ ] rabbitmq_federation_management 3.8.2
[ ] rabbitmq_jms_topic_exchange 3.8.2
[E*] rabbitmq_management 3.8.2
[e*] rabbitmq_management_agent 3.8.2
[E*] rabbitmq_mqtt 3.8.2 <== 켜졌다.
[ ] rabbitmq_peer_discovery_aws 3.8.2
[ ] rabbitmq_peer_discovery_common 3.8.2
[ ] rabbitmq_peer_discovery_consul 3.8.2
[ ] rabbitmq_peer_discovery_etcd 3.8.2
[ ] rabbitmq_peer_discovery_k8s 3.8.2
[ ] rabbitmq_prometheus 3.8.2
[ ] rabbitmq_random_exchange 3.8.2
[ ] rabbitmq_recent_history_exchange 3.8.2
[ ] rabbitmq_sharding 3.8.2
[ ] rabbitmq_shovel 3.8.2
[ ] rabbitmq_shovel_management 3.8.2
[ ] rabbitmq_stomp 3.8.2
[ ] rabbitmq_top 3.8.2
[ ] rabbitmq_tracing 3.8.2
[ ] rabbitmq_trust_store 3.8.2
[e*] rabbitmq_web_dispatch 3.8.2
[ ] rabbitmq_web_mqtt 3.8.2
[ ] rabbitmq_web_mqtt_examples 3.8.2
[ ] rabbitmq_web_stomp 3.8.2
[ ] rabbitmq_web_stomp_examples 3.8.2
rabbitmq-server start- foreground로 돌린다.
service daemon으로 돌린다.
service rabbitmq-server [start / restart / stop]
ubuntu@ubuntu:/$ service --status-all
....
[ - ] pulseaudio-enable-autospawn
[ + ] rabbitmq-server <= 서비스 떠있는것을 확인 할 수 있다.
[ - ] rsync
....
관리자 아이디와 암호 설정.
ubuntu@ubuntu:/$ sudo rabbitmqctl add_user
Adding user "ubuntu" ...
방금 만든 ID를 관리자로 지정한다.
ubuntu@ubuntu:/$ sudo rabbitmqctl set_user_tags ubuntu administrator
Setting tags for user "ubuntu" to [administrator] ...
크롬으로 들어가본다.
http://192.168.0.65:15672/
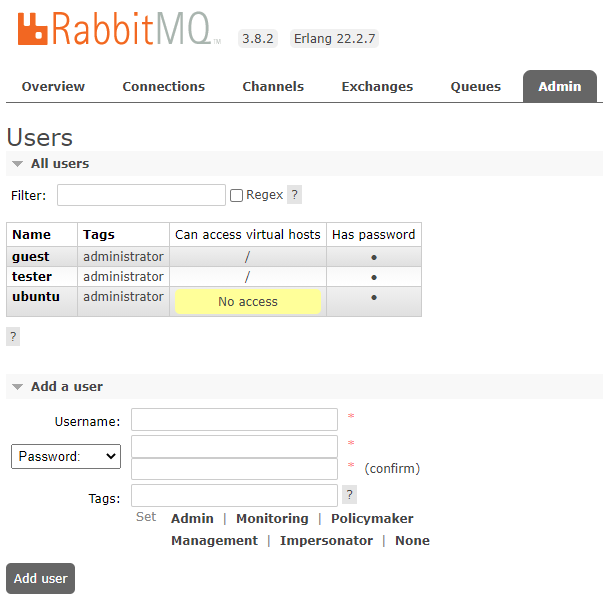
방금 만든 관리자 id와 비밀번호로 로그인 한다.
관리자 페이지가 보인다.
초보를 위한 가이드
Part 1: RabbitMQ for beginners - What is RabbitMQ? - CloudAMQP
Part 1: RabbitMQ for beginners - What is RabbitMQ? - CloudAMQP
The first part of RabbitMQ for beginners explains what RabbitMQ and message queueing is - the guide also gives a brief understanding of message queueing and defines important concepts. The guide goes on to explain the steps to set up a connection and the b
www.cloudamqp.com
mqtt를 위한 port 설정. rabbitmq.config 파일에 다음과 같이 써준다. 없으면 만든다.
ubuntu@ubuntu:/etc/rabbitmq$ cat /etc/rabbitmq/rabbitmq.config
[{rabbit, [{tcp_listeners, [5672]}]},
{rabbitmq_mqtt, [{tcp_listeners, [1883]}]}
].
서비스를 재시작 한다.
ubuntu@ubuntu:/etc/rabbitmq$ service rabbitmq-server restart
==== AUTHENTICATING FOR org.freedesktop.systemd1.manage-units ===
Authentication is required to restart 'rabbitmq-server.service'.
Authenticating as: Ubuntu (ubuntu)
Password:
==== AUTHENTICATION COMPLETE ===
python 으로 테스트해보자.
Part 2.3: Getting started with RabbitMQ and Python - CloudAMQP
Part 2.3: Getting started with RabbitMQ and Python - CloudAMQP
Full code # example_publisher.py import pika, os, logging logging.basicConfig() # Parse CLODUAMQP_URL (fallback to localhost) url = os.environ.get('CLOUDAMQP_URL', 'amqp://guest:guest@localhost/%2f') params = pika.URLParameters(url) params.socket_timeout =
www.cloudamqp.com
pip가 없어서 먼저 깐다.
ubuntu@ubuntu:/etc/rabbitmq$ sudo apt-get install python3-pip
Reading package lists... Done
Building dependency tree
Reading state information... Done
The following additional packages will be installed:
build-essential dpkg-dev fakeroot libalgorithm-diff-perl libalgorithm-diff-xs-perl libalgorithm-merge-perl libfakeroot python-pip-whl python3-wheel
Suggested packages:
debian-keyring
The following NEW packages will be installed:
build-essential dpkg-dev fakeroot libalgorithm-diff-perl libalgorithm-diff-xs-perl libalgorithm-merge-perl libfakeroot python-pip-whl python3-pip python3-wheel
0 upgraded, 10 newly installed, 0 to remove and 0 not upgraded.
Need to get 2,895 kB of archives.
After this operation, 6,185 kB of additional disk space will be used.
Do you want to continue? [Y/n] Y
pika를 깐다.
Introduction to Pika — pika 1.1.0 documentation
Introduction to Pika
Pika is a pure-Python implementation of the AMQP 0-9-1 protocol that tries to stay fairly independent of the underlying network support library.
Introduction to Pika — pika 1.1.0 documentation
© Copyright 2009-2017, Tony Garnock-Jones, Gavin M. Roy, Pivotal Software, Inc and contributors. Revision a3ae3e5a.
pika.readthedocs.io
If you have not developed with Pika or RabbitMQ before, the Introduction to Pika documentation is a good place to get started.
ubuntu@ubuntu:/etc/rabbitmq$ python3 -m pip install pika
Collecting pika
Downloading pika-1.1.0-py2.py3-none-any.whl (148 kB)
|████████████████████████████████| 148 kB 1.7 MB/s
Installing collected packages: pika
Successfully installed pika-1.1.0
rabbitmq 관리자 페이지에 대한 설명
Part 3: The RabbitMQ Management Interface - CloudAMQP
Part 3: The RabbitMQ Management Interface - CloudAMQP
The RabbitMQ Management is a user-friendly interface that let you monitor and handle your RabbitMQ server from a web browser. Among other things queues, connections, channels, exchanges, users and user permissions can be handled - created, deleted and list
www.cloudamqp.com
publisher 코드
# example_publisher.py
import pika, os, logging
logging.basicConfig()

# Parse CLODUAMQP_URL (fallback to localhost)
url = os.environ.get('TEST_AMQP_URL', 'amqp://만든ID:만든PASSWD@localhost/%2f')
params = pika.URLParameters(url)
params.socket_timeout = 5

connection = pika.BlockingConnection(params) # Connect to CloudAMQP
channel = connection.channel() # start a channel
channel.queue_declare(queue='pdfprocess') # Declare a queue
# send a message

channel.basic_publish(exchange='', routing_key='pdfprocess', body='User information')
print ("[x] Message sent to consumer")
connection.close()
설정가능한 params는 다음을 참고한다.
Connection Parameters — pika 1.1.0 documentation
Connection Parameters — pika 1.1.0 documentation
To maintain flexibility in how you specify the connection information required for your applications to properly connect to RabbitMQ, pika implements two classes for encapsulating the information, ConnectionParameters and URLParameters. URLParameters The U
pika.readthedocs.io
tester:tester 를 쓰기 위해서 user 설정을 해준다.
ubuntu@ubuntu:~/rabbit_test$ python3 ./pup.py
amqp://tester:tester@localhost/%2f
[x] Message sent to consumer
이렇게 여러번 하면

consumer를 만들어서 돌리면
ubuntu@ubuntu:~/rabbit_test$ cat consumer.py
# example_consumer.py
import pika, os, time

def pdf_process_function(msg):
    print(" PDF processing")
    print(" [x] Received " + str(msg))

    time.sleep(5) # delays for 5 seconds
    print(" PDF processing finished");
    return;

# Access the CLODUAMQP_URL environment variable and parse it (fallback to localhost)
url = os.environ.get('TEST_AMQP_URL', 'amqp://tester:tester@localhost:5672/%2f')
params = pika.URLParameters(url)
connection = pika.BlockingConnection(params)
channel = connection.channel() # start a channel
channel.queue_declare(queue='pdfprocess') # Declare a queue

# create a function which is called on incoming messages
def callback(ch, method, properties, body):
    pdf_process_function(body)

    # set up subscription on the queue
channel.basic_consume('pdfprocess',
    callback,
    auto_ack=True)

# start consuming (blocks)
channel.start_consuming()
connection.close()
잘된다.
'Linux > Linux 일반' 카테고리의 다른 글
| xubuntu 20.04 설치 (nvidia 호환문제, 설치 후 세팅) (2) | 2020.12.10 |
|---|---|
| raspberry pi bluetoothctl 사용하기 (블루투스) (0) | 2020.11.20 |
| ubuntu mkimage, adb, fastboot 설치 (0) | 2020.02.27 |


