Android C native development – take full control!
출처 : http://www.pocketmagic.net/?p=682
A recent project I've been working on required Bluetooth programming on the Android.
Having a quick look over the latest 1.5 Android SDK, I could see that bluetooth support was missing. Later research pointed out that Google expressively excluded Bluetooth APIs blaming lack of time.
On the other hand, I'm not a big Java fan, to say the least. I find Java unfriendly, and I don't like the look and feel of Java apps. Sorry, I prefer C/C++ since it provides better control and flexibility. So it's time to start doing C/C++ native applications for the Google Android.
How run a C program on Google Android?
First thing I'll show here, is to compile a simple C program for the Android.
 |
|
Save this program as test.c. In the next steps we'll be compiling this sample for the Google Android using gcc.
The tools
1. Download ubuntu linux. I currently use Desktop edition 9.04 in a virtual machine.
Attention: You'll need to install Ubuntu on a machine with at least 1.5GB Ram, 10GB ext2 partition and 2GB Swap partition or you won't be able to use this tutorial's info (less then the minimum requirements will result in the impossibility of compiling the Android Code and we need that for the libraries).
2. Once Ubuntu is installed, download the Android Source code. On your linux box install additional packages:
$ sudo apt-get install git-core gnupg sun-java5-jdk flex bison gperf libsdl-dev libesd0-dev libwxgtk2.6-dev build-essential zip curl libncurses5-dev zlib1g-dev

$ sudo apt-get install valgrind
This one is only for Ubuntu Intrepid users:
$ sudo apt-get install lib32readline5-dev
3. Install Repo
Create a ~/bin directory in your home directory, and check to be sure that this bin directory is in your path:
$ cd ~

$ mkdir bin

$ echo $PATH
To add it to the Path, you can use:
$ PATH=$PATH:~/bin/
Download the repo script and make sure it is executable:
$ curl http://android.git.kernel.org/repo >~/bin/repo

$ chmod a+x ~/bin/repo
4. Initializing a Repo client
Create an empty directory to hold your working files:
$ mkdir mydroid

$ cd mydroid
Run repo init to bring down the latest version of Repo with all its most recent bug fixes. You must specify a URL for the manifest:
$ repo init -u git://android.git.kernel.org/platform/manifest.git

$ repo init -u git://android.git.kernel.org/platform/manifest.git -b cupcake
When prompted, configure Repo with your real name and email address. If you plan to submit code, use an email address that is associated with a Google account.
A successful initialization will end with a message such as
repo initialized in /mydroid
Your client directory should now contain a .repo directory where files such as the manifest will be kept.
5. Getting the files
To pull down files to your working directory from the repositories as specified in the default manifest, run
$ repo sync
For more about repo sync and other Repo commands, see Using Repo and Git.
The Android source files will be located in your working directory under their project names.
6.Verifying Git Tags
Load the following public key into your GnuPG key database. The key is used to sign annotated tags that represent releases.
$ gpg --import
then paste the key(s) below, and press Control-D to end the input and process the keys.
key 9AB10E78: "The Android Open Source Project <initial-contribution@android.com>"

-----BEGIN PGP PUBLIC KEY BLOCK-----

Version: GnuPG v1.4.2.2 (GNU/Linux)
mQGiBEnnWD4RBACt9/h4v9xnnGDou13y3dvOx6/t43LPPIxeJ8eX9WB+8LLuROSV
lFhpHawsVAcFlmi7f7jdSRF+OvtZL9ShPKdLfwBJMNkU66/TZmPewS4m782ndtw7
8tR1cXb197Ob8kOfQB3A9yk2XZ4ei4ZC3i6wVdqHLRxABdncwu5hOF9KXwCgkxMD
u4PVgChaAJzTYJ1EG+UYBIUEAJmfearb0qRAN7dEoff0FeXsEaUA6U90sEoVks0Z
wNj96SA8BL+a1OoEUUfpMhiHyLuQSftxisJxTh+2QclzDviDyaTrkANjdYY7p2cq
/HMdOY7LJlHaqtXmZxXjjtw5Uc2QG8UY8aziU3IE9nTjSwCXeJnuyvoizl9/I1S5
jU5SA/9WwIps4SC84ielIXiGWEqq6i6/sk4I9q1YemZF2XVVKnmI1F4iCMtNKsR4
MGSa1gA8s4iQbsKNWPgp7M3a51JCVCu6l/8zTpA+uUGapw4tWCp4o0dpIvDPBEa9
b/aF/ygcR8mh5hgUfpF9IpXdknOsbKCvM9lSSfRciETykZc4wrRCVGhlIEFuZHJv
aWQgT3BlbiBTb3VyY2UgUHJvamVjdCA8aW5pdGlhbC1jb250cmlidXRpb25AYW5k
cm9pZC5jb20+iGAEExECACAFAknnWD4CGwMGCwkIBwMCBBUCCAMEFgIDAQIeAQIX
gAAKCRDorT+BmrEOeNr+AJ42Xy6tEW7r3KzrJxnRX8mij9z8tgCdFfQYiHpYngkI
2t09Ed+9Bm4gmEO5Ag0ESedYRBAIAKVW1JcMBWvV/0Bo9WiByJ9WJ5swMN36/vAl
QN4mWRhfzDOk/Rosdb0csAO/l8Kz0gKQPOfObtyYjvI8JMC3rmi+LIvSUT9806Up
hisyEmmHv6U8gUb/xHLIanXGxwhYzjgeuAXVCsv+EvoPIHbY4L/KvP5x+oCJIDbk
C2b1TvVk9PryzmE4BPIQL/NtgR1oLWm/uWR9zRUFtBnE411aMAN3qnAHBBMZzKMX
LWBGWE0znfRrnczI5p49i2YZJAjyX1P2WzmScK49CV82dzLo71MnrF6fj+Udtb5+
OgTg7Cow+8PRaTkJEW5Y2JIZpnRUq0CYxAmHYX79EMKHDSThf/8AAwUIAJPWsB/M
pK+KMs/s3r6nJrnYLTfdZhtmQXimpoDMJg1zxmL8UfNUKiQZ6esoAWtDgpqt7Y7s
KZ8laHRARonte394hidZzM5nb6hQvpPjt2OlPRsyqVxw4c/KsjADtAuKW9/d8phb
N8bTyOJo856qg4oOEzKG9eeF7oaZTYBy33BTL0408sEBxiMior6b8LrZrAhkqDjA
vUXRwm/fFKgpsOysxC6xi553CxBUCH2omNV6Ka1LNMwzSp9ILz8jEGqmUtkBszwo
G1S8fXgE0Lq3cdDM/GJ4QXP/p6LiwNF99faDMTV3+2SAOGvytOX6KjKVzKOSsfJQ
hN0DlsIw8hqJc0WISQQYEQIACQUCSedYRAIbDAAKCRDorT+BmrEOeCUOAJ9qmR0l
EXzeoxcdoafxqf6gZlJZlACgkWF7wi2YLW3Oa+jv2QSTlrx4KLM=
=Wi5D
-----END PGP PUBLIC KEY BLOCK-----
After importing the keys, you can verify any tag with
$ git tag -v tagname
7. Building the code
The Android code contains a bug that hasn't been solved up to the date of this article.
So before you start compiling the code, you'll need a few modifications, or the build will fail (after consuming some of your time and patience). The error is:
external/qemu/sockets.c: In function 'sock_address_init_resolve':

external/qemu/sockets.c:637: error: 'EAI_NODATA' undeclared (first use

in this function)

external/qemu/sockets.c:637: error: (Each undeclared identifier is

reported only once

external/qemu/sockets.c:637: error: for each function it appears in.)

make: *** [out/host/linux-x86/obj/EXECUTABLES/emulator_intermediates/

sockets.o] Error 1
To fix this, before compiling the android code, open ~/mydroid/external/qemu/sockets.c and add
#define __USE_GNU
just before the #include <netdb.h>
Now you can build the files. Run make from within your working directory:
$ cd ~/mydroid

$ make
On my virtual machine running ubuntu, the build process took several hours. The host PC is a 2.6GHz P4.
Compile test.c with gcc for the Android platform
Android uses a simplified version of libc, called bionic. We need to compile using Android's prebuilt cross-compiler arm-eabi-gcc, and use the bionic library on the phone.
The easy way to do this is to use the agcc perl wrapper. You can download the original file here, and modify
my $TOOLCHAIN = "$DROID/prebuilt/linux-x86/toolchain/arm-eabi-4.2.1";
to
my $TOOLCHAIN = "$DROID/prebuilt/linux-x86/toolchain/arm-eabi-4.3.1";
Or download this updated version directly.
Copy agcc to your home directory, and chmod it:
chmod +x agcc
then set the PATH to the bionic libs and the agcc location:
$ PATH=$PATH:~/mydroid/prebuilt/linux-x86/toolchain/arm-eabi-4.3.1/bin:~/:~/mydroid/
Now you can compile the test.c file:
agcc test.c -o test
Take the resulting test binary and upload it to your android using:
adb push test /data/local/test
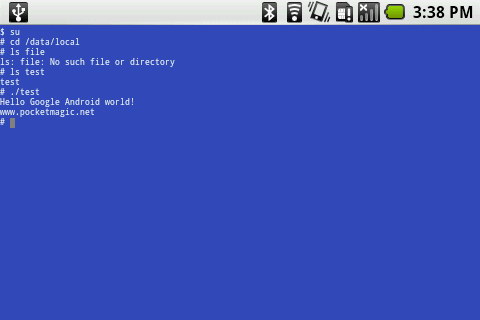
Then run it:
adb shell

chmod 775 test

./test
'Android' 카테고리의 다른 글
| Hello World C program using Android Toolchain (0) | 2010.02.09 |
|---|---|
| Android System Library 개요 (0) | 2010.02.08 |
| Android Market SlideMe 에서 게임 다운로드 받기(s3c6410) (0) | 2010.02.07 |


